3 Signs You Need To Outsource Your Business Website Needs
If you’re launching a business, then it’s highly unlikely you need telling that you need a website. Every business needs a website these days; without,…

Naming Your New Business
It’s common for people to view naming a new business (or product/service) as a fun rather than the serious activity it should be. Having a…

Mobile First: Web Sites, Apps, Leads, Sales, Analytics & Support
Mobile first is when a product or service is provided primarily on smartphones rather than on the desktop or laptop. This isn’t just about web…

Are You Neglecting Your Customers?
It’s hardly a controversial statement to say that a business cannot exist without customers. Without customers, your business is little more than an incredibly expensive,…

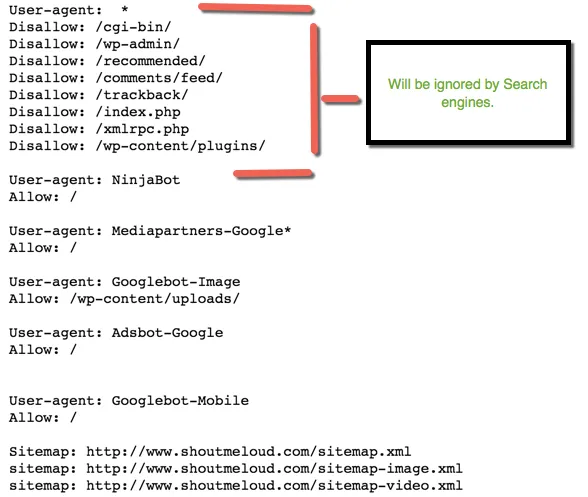
What Effect Does Robots.txt Have on SEO?
If you have never heard of robots.txt, do not panic. It’s not compulsory, but it can be used to control what search engines see on…
Mobile Development Primer
As a mobile development company, many individuals and companies approached us with ideas for mobile development. Some people weren’t from the mobile ecosystem or even…
Enterprise New Business: Mobile, Cloud, AI and IoT
‘New business’ doesn’t have to be a startup. It can be innovation within a large company. Here, I cover problems I have seen with innovation…
Product Complexity: App, Software & Website
At some stage, most ‘new business’ needs to write software or create a new software product. A common problem is that what seems a simple…

Developer Involvement in Screen Planning
Projects rarely give much thought as to who is to design and continue to evolve the screen layouts over time. Sometimes it’s one of the…
From Mobile First to Mobile Native
Benedict Evans has a post on from mobile first to mobile native where he says he is seeing an evolution beyond ‘mobile first’ to what he calls ‘mobile native’. This…