Install Upgraded GNU Bash on a Macbook Pro

When you get a new Macbook Pro with M1 chip you get an old version of Bash.

Bash isn’t old. It’s still being maintained. It has millions of Linux and Windows users. Here’s how to put the newest version of Bash back inside your MacOS box.

Prerequisite: Install Homebrew. (Install iTerm2 for good measure.)

Install Bash and the bare minimum of things things you would expect it to have:

 
brew install bash bash-completion lesspipe 

Verify that it’s installed:

 
which -a bash
There are now different Bash versions on your Mac, choose the newest one.

Add it to your /etc/shells file:

sudo nano /etc/shells
List of acceptable shells.

Change your default shell to the new Bash:

chsh -s /opt/homebrew/bin/bash

Create a .profile and .bashrc that resembles what you would see in Ubuntu 22.04’s /etc/skel folder:

From here, create your .bash_aliases and make all the other adjustments you’ve been doing since 1989… Bash not dead!

Ubuntu 22.04 LTS Inside Windows 11

Running Ubuntu 22.04 LTS on Windows 11 is a breeze.

First, install Windows Terminal and Ubuntu from the Microsoft store. Next, in Ubuntu, setup your .bash_aliases hacks and sudo apt installs. Finally, windows_98_tada.wav

Ubuntu WSL
Tip 1: Make sure the line endings in your .bash_aliases file are LF and not CRLF or you’ll get weird “not found” errors. Tip 2: cd-home is my alias to cd /mnt/c/Users/ME

If you’re like me, a developer who wants Ubuntu not Windows to be the main environment when working, create a /etc/wsl.conf file with:

[automount]
options = "metadata,umask=022,fmask=111,case=off"

This makes file permissions in /mnt/c behave like how you would expect in Linux. More info.

After this change all files in /mnt/c/Program Files/ and /mnt/c/Program Files (x86)/ requires the WSL terminal to be started as administrator to be able to modify permissions (aka chmod +x)  and it is not currently possible to change permissions in /mnt/c/Windows/

To make Git in Windows more compatible with your workflow (not Git in Ubuntu leave it alone) add this to your .gitconfig

[core]
autocrlf = false
fileMode = false

More in depth info available here.

PHP and Go, Together at Last!

PHP and Go, Together At Last!
PHP and Golang, together at last!

This blog post is about Spiral Framework and Roadrunner Server. I’ll briefly talk about what they are, then show how to compile a custom Roadrunner server, start developing with Spiral, using Docker.

Explain Like I’m 5 PHP Developers

Roadrunner works by creating a HTTP server with Golang’s excellent net/http package, and using Goridge as a bridge to pass PSR7 Request and Responses between PHP and Go. The PHP application is then a long-running, already bootstrapped PSR7-capable application that received the already parsed PSR7 request, dispatches it, and collects the response to give back into Go. [1]

Roadrunner offloads unnecessary operations from PHP to a more optimized server, and effectively swaps out the classic setup of Nginx+FPM with a PHP/Golang application that boosts flexibility and performance. [2]

Roadrunner can serve static files without the presence of Nginx, therefore, simplifying the creation of Docker containers. [3]

You can extend your PHP application by including Go libraries, [4], writing Go HTTP middleware, [5], or tweaking and extending the Roadrunner server. [6]

Spiral is a PHP Framework with a customized Roadrunner server. The main difference is that, when you use Spiral’s version of Roadrunner, it comes with more out-of-the-box solutions for PHP developers, Ie.

It’s possible to download the server pre-compiled, but that takes away our power of writing Go code. In this tutorial we start from scratch.

Let’s Go!

The instructions are for Mac, and assume you already have Docker Desktop installed, but the same concepts should work for Linux, and probably Windows.

Step 1

Create a directory for your project.
(If you want, replace hello-spiral with some other name.)

mkdir ~/hello-spiral

Step 2

Create a subdirectory called ./server/ and copy these files into it:

Example:

 
cd ~/hello-spiral
mkdir server
cd server
wget https://raw.githubusercontent.com/spiral/framework/master/main.go
wget https://raw.githubusercontent.com/spiral/framework/master/go.mod

Step 3

Download this Dockerfile into the root dir of ~/hello-spiral

The first stage compiles the app server, the second stage installs the Spiral skeleton app.

Step 4

Your file tree should look like this:

cd ~/hello-spiral; tree

Build a new Docker image:

cd ~/hello-spiral
docker build -t hello-spiral .

Step 5

Run the new Docker image:

docker run -it -p 8080:8080 -p 2112:2112 hello-spiral

Step 6

Go to http://localhost:8080 and verify that it works.

localhost:8080

Tada! It runs, but how do we develop?

Step 7

Let’s copy all the PHP files that were successfully installed in the container to our host, then mount them.

While the container is still running from Step 5, in another shell, do:

cd ~/hello-spiral
docker ps

This command will output your container ID:

docker ps

Use your ID in the next command (replace 1f057ae4e473 with your own id):

docker cp 1f057ae4e473:/var/www/app/. src

In the shell tab that is still running the server, stop the server (ctrl-c), then restart with a slight variation of the command from Step 5:

docker run -it -p 8080:8080 -p 2112:2112 -v "$(pwd)"/src:/var/www/app:cached hello-spiral

Keep Going!

Your local PHP files are now mounted in ~/hello-spiral/src, start developing! Change your Dockerfile:

# Setup Spiral
# RUN composer create-project spiral/app . --no-scripts
# Or comment above, uncomment below, and copy Spiral 
COPY ./src/ .

If you make changes in ~/hello-spiral/server, rebuild!

Git Squash at the Command Line with a Bash Script

Useful if the commits on your branch are sloppy, and you want to clean them up, and you don’t mind that your new commits will be file based instead of time based.

What does that mean exactly? Let’s say you worked two days on 3 files. (One of the files was a class, another a config, and the third a unit test.) Over the course of two days you made 13 commits. Sometimes a commit was to one file, sometimes a commit was to both, sometimes all three… 13 times! (Sloppy! You should be ashamed.) After running the script below you will lose 13 commits but can restage and create either a single commit message, or up to 3 new commit messages: One for each file. (Clean! Dick Grune approved.)

Useful if you’re too lazy to use rebase with fixup. Instead, just run one cheap and barely good enough bash script and you’re done. So lazy in fact you’re scrolling through all these words not even reading them, get to the script already.

Useful in scenarios where GitHub’s Squash & Merge interface is unavailable.

Prerequisites before running the script below, where feature/foo is your branch:

  • The script is saved somewhere in your path.
  • You are working on branch feature/foo. You want to create a single squashed commit, or restage in batches, up to as many commits as you have files.
  • You have merged “destination” into feature/foo and resolved conflicts.
  • You are the author of all the commits on feature/foo (Or want to be the author? You will be rewriting…)
  • You are currently on feature/foo.
#!/bin/bash
set -e
destination='master'
branch=$(git rev-parse --abbrev-ref HEAD)
git checkout ${destination}
git pull
git checkout ${branch}
git checkout -b ${branch}-backup
git checkout ${destination}
git branch -D ${branch}
git checkout -b ${branch}
git merge --squash ${branch}-backup
_done="
Everything seems fine. Next steps:
    git status
    git commit # Or re-stage and do multiple commits
    git push --force-with-lease --set-upstream origin ${branch}

To undo:
    git reset HEAD .
    git checkout -- .
    git checkout ${destination}
    git branch -d ${branch}
    # If branch exists on GiHub:
    git branch -D ${branch}-backup
    git fetch
    git checkout ${branch}
    # Else:
    git branch -m ${branch}-backup ${branch}
"
echo "$_done"

Source code.

After running this script your files will be staged. You can either rewrite a nice single commit message for all the files, restage and commit in batches, or undo.

Inspired by this Gist.

Refactor Your Slow Form Using PHP Generators and Event Streams

Your form will still be slow but the user experience will be better. They will see a progress bar and see status updates in real time. The idea is to refactor something like this:

/**
 * A task that takes way too loooooooooooooooooooooooong...
 */
function task() {
    step1();
    step2();
    step3();
    //
    step100();
}

Into this:

/**
 * Yields a key/value pair
 * The key is between 1-100 and represents percentage completed
 * The value is a string of information for the user
 *
 * @return Generator
 */
function taskGenerator() {
    step1();
    yield 1 => 'Completed step 1';
    step2();
    yield 2 => 'Completed step 2';
    step3();
    yield 3 => 'Completed step 3';
    //
    step100();
    yield 100 => 'Completed step 100';
}
/**
 * A task that takes way too loooooooooooooooooooooooong...
 */
function task() {
    foreach (taskGenerator() as $percentage => $info) {
        // Do nothing, this is a compatibility wrapper 
        // that makes our generator work like a regular function
    }
}

And this:


let evtSource = new EventSource(url);

Before

Imagine you have this form somewhere on your corporate intranet:

Spinning beach ball of death. (Source code)

The user clicks submit. They wait, and wait, and wait. The task completes and they receive some feedback saying “everything seems fine”. It’s not particularly good but it does the job. Your company doesn’t have the resources, infrastructure, or competence to setup job queues and delegate these kind of tasks into the background. Everyone lives with it. The end.

Insert cliché “What if I told you” meme here.

After

It is possible to use PHP Generators and Event Streams to provide real-time feedback to the web browser.

The EventStream console in Chrome Browser.

With a bit of refactoring your old form could, instead, behave like this:

A status bar with real-time status updates. (Source code)

The heavy drinking in the new form is an EventEmitter class (Source code).

On the front end, the main changes were from this:

<input type="submit">

To:

<p><input type="submit"></p>
<div id="sse-progressbar"></div>
<p id="sse-info"></p>

And some JavaScript near the end of the form:

$('#tpsreport').on('submit', function (e) {
    e.preventDefault();
    let formSubmitButton = $('#tpsreport :submit');
    formSubmitButton.attr('disabled', true);

    let form = $('#tpsreport');
    let actionUrl = form.prop('action');
    let eventSourceUrl = actionUrl + (actionUrl.includes('?') ? '&' : '?') + $.param(form.find(':input'));

    let evtSource = new EventSource(eventSourceUrl);
    evtSource.onopen = function () {
        formSubmitButton.hide();
    };
    evtSource.onmessage = function (message) {
        let bar = $('#sse-progressbar');
        let info = $('#sse-info');
        let data = JSON.parse(message.data);
        switch (data.action) {
            case 'updateStatusBar':
                bar.progressbar({value: parseInt(data.percentage, 10)});
                info.html(data.info);
                break;
            case 'complete':
                evtSource.close();
                if (data.error) {
                    bar.progressbar({value: false});
                    info.html(data.error);
                } else {
                    window.location = actionUrl;
                }
                break;
        }
    };
    evtSource.onerror = function () {
        evtSource.close();
        $('#sse-progressbar').progressbar({value: false});
        $('#sse-info').html('EventStream Connection Error');
    };
});

The JavaScript (and jQuery) snippet:

  • Targets the form with id tpsreport
  • Stops the form from submitting and instead
  • Appends all the form data as $_GET parameters to the form’s action URL then
  • Passes that to a new EventSource
  • Updates sse-progressbar and sse-info when it receives an event stream message
  • Redirects the user back to the action URL when complete

On the back end, the time consuming function was refactored into a generator that yields a key/value pair. The key is between 1-100 and represents percentage completed. The value is a string of information meant for the user. Once you have a generator that follows this convention, pass it to the EventEmitter. The browser will start receiving an event stream.

/**
 * @return Generator
 */
function loooooooooooooooooooooooongGenerator() {
    yield 10 => "Hey Peter what's happening. I'm going to need those TPS reports... ASAP...";
    sleep(2);
    yield 30 => "Ah, ah, I almost forgot... I'm also going to need you to go ahead and come in on Sunday, too. We, uhhh, lost some people this week and we sorta need to play catch-up. Mmmmmkay? Thaaaaaanks.";
    sleep(2);
    yield 50 => '...So, if you could do that, that would be great...';
    sleep(2);
    yield 60 => 'Excuse me, I believe you have my stapler.';
    sleep(2);
    yield 90 => 'PC LOAD LETTER';
    sleep(2);
    yield 100 => 'Success!';
}
$emitter = new \KIZU514\EventEmitter();
$emitter->emit( loooooooooooooooooooooooongGenerator() );

Key ideas:

  • It’s not necessary to wait until the request finishes, PHP can emit event-stream responses (SSE) back to the web browser while it is working on something.
  • PHP Generators are a relatively simple refactoring hack to get those responses back to the browser.
  • sleep() is only meant as an example of a function call that takes a long time to finish, don’t put sleep in your production code, you already knew this, I hope?

TL;DRhttps://gist.github.com/connerbw/a2fa7712efe135d5854f4d32d67ca09f

Howto Fix Headset, Headphones with a Microphone, on a Dell Laptop

This was annoyingly unobvious, but when you plug your headset into your audio jack and the MaxxAudioPro popup appears:

One of these rows is not like the other.

Click the word “Headset” (because it’s a button!):

Can you tell me which one it is?

If  you don’t see a MaxxAudioPro dialog when you plug your headphones into the computer, turn that feature on:

Dell Inspiron -> Start -> MaxxAudioPro

Using MySQL Deadlocks To Avoid Overselling

When developing an e-commerce application, unless you work at United Airlines, you generally want to avoid overselling.

Instead of punching your customers in the face why not use MySQL Deadlocks? (Turns out this is a feature not a bug!)

First attempt, creating deadlocks

MySQL has 4 transaction isolation levels: SERIALIZABLE, REPEATABLE READ, READ UNCOMMITTED, READ COMMITTED.

In the following proof of concept, where we have 50 of the same product in stock, and we run seige to represent concurrent customers buying the same product at the same time, we expect 50 “Success!” messages in our log files.

When we use any of REPEATABLE READ, READ UNCOMMITTED, or READ COMMITTED we oversell. (boo!)

When we use SERIALIZABLE we do not oversell (yay!) but some users get deadlock errors while others do not. (SQLSTATE[40001]: Serialization failure: 1213 Deadlock found when trying to get lock; try restarting transaction)

<?php

error_reporting(E_ALL | E_STRICT); // Development

/*
SQL:
CREATE DATABASE `deadlocktest` COLLATE 'utf8_general_ci';
CREATE TABLE `products` ( `id` int NOT NULL AUTO_INCREMENT PRIMARY KEY, `inventory` int NOT NULL );
INSERT INTO `products` (`id`, `inventory`) VALUES ('123', '50');

USEFUL LINUX COMMANDS:
$ rm log.txt; touch log.txt; chmod 777 log.txt
$ seige http://host/file.php
*/

// ------------------------------------------------------------------
// Config
// ------------------------------------------------------------------

$mysqlIsolation = 'SERIALIZABLE'; // ( SERIALIZABLE, REPEATABLE READ, READ UNCOMMITTED, READ COMMITTED )
$productId = 123;
$logFile = __DIR__ . '/log.txt';

$host = '127.0.0.1';
$db = 'deadlocktest';
$user = 'root';
$pass = '';
$charset = 'utf8';
$opt = [
    PDO::ATTR_ERRMODE => PDO::ERRMODE_EXCEPTION,
    PDO::ATTR_DEFAULT_FETCH_MODE => PDO::FETCH_ASSOC,
    PDO::ATTR_EMULATE_PREPARES => false,
];

// ------------------------------------------------------------------
// Functions
// ------------------------------------------------------------------

/**
 * Simulate time it takes to call the payment gateway and do stuff
 */
function doPaymentGatewayStuff()
{
    usleep(500000); // Wait for 0.5 seconds
}

/**
 * Simulate buying a product from our inventory
 *
 * @param PDO $pdo
 * @param int $productId
 * @return int
 * @throws Exception
 */
function buyProduct(PDO $pdo, int $productId): int
{
    $pdo->beginTransaction();

    $selectStmt = $pdo->prepare('SELECT inventory FROM products WHERE id = :id ');
    $selectStmt->execute(['id' => $productId]);
    $res = $selectStmt->fetch();
    if ($res['inventory'] <= 0) {
        throw new Exception("Oh no! Sorry we're out inventory!");
    }

    $newInventory = $res['inventory'] - 1;
    $updateStmt = $pdo->prepare('UPDATE products SET inventory = :inventory WHERE id = :id ');
    $updateStmt->execute(['inventory' => $newInventory, 'id' => $productId]);

    doPaymentGatewayStuff();

    $pdo->commit();

    return $newInventory;
}

// ------------------------------------------------------------------
// Procedure
// ------------------------------------------------------------------

$uniqueUser = uniqid();
try {
    // Set up DB driver
    $pdo = new PDO("mysql:host={$host};dbname={$db};charset={$charset}", $user, $pass, $opt);
    $pdo->query("SET TRANSACTION ISOLATION LEVEL {$mysqlIsolation} ");

    // Simulate buying a product and decreasing inventory
    $newInventory = buyProduct($pdo, $productId);

    // No exceptions were thrown, we consider this successful
    $successMsg = "{$uniqueUser} - Success! Product {$productId} inventory has been decreased to {$newInventory}" . PHP_EOL;
    file_put_contents($logFile, $successMsg, FILE_APPEND);
    echo "$successMsg";
}
catch (Exception $e) {
    if (isset($pdo) && $pdo->inTransaction()) {
        $pdo->rollBack();
    }
    $errorMsg = "{$uniqueUser} - Error! " . $e->getMessage() . PHP_EOL;
    file_put_contents($logFile, $errorMsg, FILE_APPEND);
    echo "$errorMsg";
}

Second attempt, handling deadlocks

The above code has good intentions but many users get the dreaded deadlock message.

Turns out deadlocks are OK! You just have to handle them somehow.

Here’s a fixed proof of concept:

<?php

// ------------------------------------------------------------------
// Config
// ------------------------------------------------------------------

$mysqlIsolation = 'SERIALIZABLE';
$productId = 123;
$logFile = __DIR__ . '/log.txt';

$host = '127.0.0.1';
$db = 'deadlocktest';
$user = 'root';
$pass = '';
$charset = 'utf8';
$opt = [
    PDO::ATTR_ERRMODE => PDO::ERRMODE_EXCEPTION,
    PDO::ATTR_DEFAULT_FETCH_MODE => PDO::FETCH_ASSOC,
    PDO::ATTR_EMULATE_PREPARES => false,
];

// ------------------------------------------------------------------
// Functions
// ------------------------------------------------------------------

/**
 * Check if $e is of type MySQL deadlock
 *
 * @param PDO $pdo
 * @param mixed $e
 * @return bool
 */
function isDeadlock(PDO $pdo, $e): bool
{
    return (
        $e instanceof PDOException &&
        $pdo->getAttribute(PDO::ATTR_DRIVER_NAME) == 'mysql' &&
        $e->errorInfo[0] == 40001 &&
        $e->errorInfo[1] == 1213
    );
}

/**
 * Simulate time it takes to call the payment gateway and do stuff
 */
function doPaymentGatewayStuff()
{
    usleep(500000); // Wait for 0.5 seconds
}

/**
 * Simulate buying a product from our inventory
 *
 * @param PDO $pdo
 * @param int $productId
 * @return int
 * @throws Exception
 */
function buyProduct(PDO $pdo, int $productId): int
{
    $pdo->beginTransaction();

    $selectStmt = $pdo->prepare('SELECT inventory FROM products WHERE id = :id ');
    $selectStmt->execute(['id' => $productId]);
    $res = $selectStmt->fetch();
    if ($res['inventory'] <= 0) {
        throw new Exception("Oh no! Sorry we're out inventory!");
    }

    $newInventory = $res['inventory'] - 1;
    $updateStmt = $pdo->prepare('UPDATE products SET inventory = :inventory WHERE id = :id ');
    $updateStmt->execute(['inventory' => $newInventory, 'id' => $productId]);

    doPaymentGatewayStuff();

    $pdo->commit();

    return $newInventory;
}

// ------------------------------------------------------------------
// Procedure
// ------------------------------------------------------------------

$uniqueUser = uniqid();
$retry = true;
while ($retry)
{
    try {
        // Set up DB driver
        $pdo = new PDO("mysql:host={$host};dbname={$db};charset={$charset}", $user, $pass, $opt);
        $pdo->query("SET TRANSACTION ISOLATION LEVEL {$mysqlIsolation} ");

        // Simulate buying a product and decreasing inventory
        $newInventory = buyProduct($pdo, $productId);

        // No exceptions were thrown, we consider this successful
        $successMsg = "{$uniqueUser} - Success! Product {$productId} inventory has been decreased to {$newInventory}" . PHP_EOL;
        file_put_contents($logFile, $successMsg, FILE_APPEND);
        echo "$successMsg";
        $retry = false;
    }
    catch (Exception $e) {
        if (isset($pdo) && isDeadlock($pdo, $e)) {
            $retry = true;
        } else {
            $retry = false;
            if (isset($pdo) && $pdo->inTransaction()) {
                $pdo->rollBack();
            }
            $errorMsg = "{$uniqueUser} - Error! " . $e->getMessage() . PHP_EOL;
            file_put_contents($logFile, $errorMsg, FILE_APPEND);
            echo "$errorMsg";
        }
    }
}

Huge gaping caveat: With 15 concurrent users the 15th user would be waiting for a long time. Patches welcome.

PHP Composer for Developers

Ever wanted to make a bugfix to a Composer package? You can!

Get a local git clone of the dependency by requiring it with the –prefer-source option.

composer require kizu514/package --prefer-source

But wait that’s not all! If you have your own GitHub namespace you can set things up so that your own code is always installed from source. For example, In the following composer.json snippet all the packages from kizu514 are installed from source, and everything else is dist.

{
    "config": {
        "preferred-install": {
            "kizu514/*": "source",
            "*": "dist"
        }
    }
}

Ever wanted to use a git branch instead of a specific version? You can!

Use inline aliases. To declare an inline alias you must:

  • Prefix branch names with: dev
  • No wildcards (*), must be unambigous.

For example, if my composer.json file had this in it:

"kizu514/package": "1.*",

Then to use a branch I would simply change it to:

"kizu514/package": "dev-BRANCH_NAME as 1.0.9",

Where BRANCH_NAME is a branch that exists on GitHub and 1.0.9 is unambiguous. If you want to check out a branch instead of a tag then simply do:

"kizu514/package": "dev-BRANCH_NAME",

What about private repos?

Use Private Packagist or add to your repositories configuration:

{
  "type": "vcs",
  "no-api": true,
  "url":  "git@github.com:kizu514/secret-project.git"
}

But wait that’s not all! Oh wait, yes, it is.

Manifest.json

My wife’s Japanese comic about our family is a responsive website.

A cool trick I learned at ConFoo while listening to Christian Heilmann speak was that I could leverage built-in mobile technology by simply adding a manifest.json file to the code.

A manifest turns a responsive website into an installable app. It lets users add it on their mobile phone’s home screen. When they launch the site it gets a splash screen and runs in full screen mode, basically behaving like a native app.

Caveat: For this to work HTTPS is required. Use certbot if you don’t already.

I used Manifest Generator to get started and it was easy. According to the ConFoo talk Bing indexes sites with manifest.json files and prioritizes them as smartphone compatible. A simple SEO win?

Now my family’s manga is an app. Horray for the open web!

Building a Simple API using Opulence PHP

This tutorial will show you how to code a simple JSON API using Opulence PHP. We will install Opulence’s skeleton project using composer, then create a ‘user’ database entity, and finally we will match CRUD (Create, Read, Update, Delete) to POST, GET, PUT, and DELETE.

Prerequisites: PHP7, Composer, MySQL.

Installing

Create an Opulence project with the following command:

composer create-project opulence/project SimpleApi --prefer-dist 

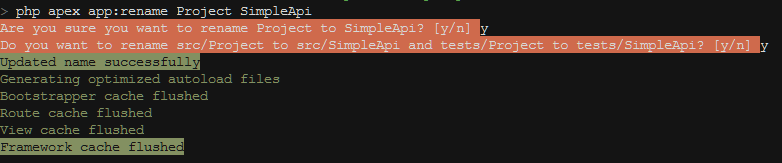
The default Opulence app name is Project. Using apex, rename it to SimpleApi.

cd SimpleApi
php apex app:rename Project SimpleApi

This command will output:

JSON Config

According to the documentation if a client does not request JSON then HTML will be returned. This is “the right way to do it” but for the sake of this API we always want to return JSON. We can do this by adding the following code to config/http/views.php:

if (!isset($_SERVER['CONTENT_TYPE'])) {
    $_SERVER['CONTENT_TYPE'] = 'application/json';
}

We also want to disable the default Session and Csrf middlewares because REST clients do not (always) work with cookies. Open config/http/middleware.php and comment out:

return [
    CheckMaintenanceMode::class,
//    Session::class,
//    CheckCsrfToken::class
];

Database Config

Out of the box PostgreSQL is the default database driver. To use MySQL change line ~5 in src/SimpleApi/Application/Bootstrappers/Databases/SqlBootstrapper.php from PostgreSQL to:

use Opulence\Databases\Adapters\Pdo\MySql\Driver;

Manually create a MySQL database named simpleapi and modify config/environment/.env.app.php accordingly.

Environment::setVar('DB_HOST', 'localhost');
Environment::setVar('DB_USER', 'root');
Environment::setVar('DB_PASSWORD', 'root');
Environment::setVar('DB_NAME', 'simpleapi');
Environment::setVar('DB_PORT', 3306);

Database Entity

Create a user table with the following columns: [ id (primary), email (unique), firstname (string), lastname (string), age (integer, optional) , country (2 character string) ]

CREATE TABLE `user` (
  `id` int NOT NULL AUTO_INCREMENT PRIMARY KEY,
  `email` varchar(255) NOT NULL UNIQUE,
  `firstname` varchar(255) NOT NULL,
  `lastname` varchar(255) NOT NULL,
  `age` int,
  `country` char(2) NOT NULL
);

Using apex, create a matching entity class named User.

php apex make:entity User


Note: These commands create stubs / empty templates. You must finish the code yourself!


Open the newly created src/SimpleApi/User.php and finish the mutator methods so that the properties match the database table. Implement JsonSerializable too.

<?php 
namespace SimpleApi; 

use Opulence\Orm\IEntity; 

class User implements IEntity, \JsonSerializable { 

    /** @var int */ 
    private $id;
 
    /** @var string */ 
    private $email; 

    /** @var string */ 
    private $firstname; 

    /** @var string */ 
    private $lastname; 

    /** @var int|null */ 
    private $age; 

    /** @var string */ 
    private $country; 

    public function getId(): int 
    { 
        return (int)$this->id;
    }

    public function setId($id): self
    {
        $this->id = $id;

        return $this;
    }

    public function getEmail(): string
    {
        return $this->email;
    }

    public function setEmail($email): self
    {
        $this->email = $email;

        return $this;
    }

    public function getFirstname(): string
    {
        return $this->firstname;
    }

    public function setFirstname($firstname): self
    {
        $this->firstname = $firstname;

        return $this;
    }

    public function getLastname(): string
    {
        return $this->lastname;
    }

    public function setLastname($lastname): self
    {
        $this->lastname = $lastname;

        return $this;
    }

    /**
     * @return int|null
     */
    public function getAge()
    {
        return $this->age;
    }

    public function setAge($age): self
    {
        $this->age = $age;

        return $this;
    }

    public function getCountry(): string
    {
        return $this->country;
    }

    public function setCountry($country): self
    {
        $this->country = $country;

        return $this;
    }

    public function jsonSerialize() : array
    {
        return [
            'id' => (int)$this->getId(),
            'email' => $this->getEmail(),
            'firstname' => $this->getFirstname(),
            'lastname' => $this->getLastname(),
            'age' => is_null($this->getAge()) ? null : (int)$this->getAge(),
            'country' => $this->getCountry(),
        ];
    }
}

Open src/SimpleApi/Application/Bootstrappers/Orm/OrmBootstrapper.php and register an ID generator for \SimpleApi\User

private function registerIdGenerators(IIdGeneratorRegistry $idGeneratorRegistry)
{
    // Register your Id generators for classes that will be managed by the unit of work
    $idGeneratorRegistry->registerIdGenerator(
        \SimpleApi\User::class,
        new \Opulence\Orm\Ids\Generators\IntSequenceIdGenerator('user_id_seq')
    );
}

Database Mapper

Using apex, create a SQL data mapper named User. When prompted pick SQL data mapper and use \SimpleApi\User as the entity.

php apex make:datamapper User

This command will output:

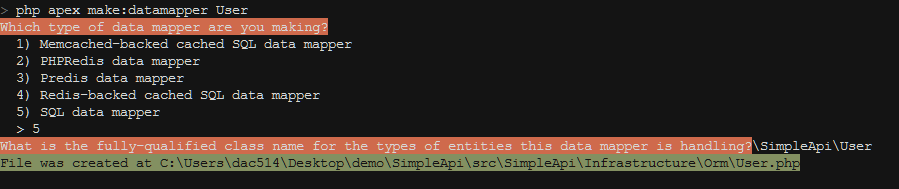
Open the newly created src/SimpleApi/Infrastructure/Orm/User.php and finish the stubs.

<?php 

namespace SimpleApi\Infrastructure\Orm; 

use Opulence\Orm\DataMappers\SqlDataMapper; 
use Opulence\Orm\OrmException; 

class User extends SqlDataMapper { 

   /** 
    * Adds an entity to the database 
    *
    * @param \SimpleApi\User $user The entity to add 
    * @throws OrmException Thrown if the entity couldn't be added 
    */ 
    public function add($user) 
    { 
        $statement = $this->writeConnection->prepare(
            'INSERT INTO user (email, firstname, lastname, age, country)
             VALUES (:email, :firstname, :lastname, :age, :country)'
        );
        $statement->bindValues([
            'email' => $user->getEmail(),
            'firstname' => $user->getFirstname(),
            'lastname' => $user->getLastname(),
            'age' => $user->getAge(),
            'country' => $user->getCountry(),
        ]);
        $statement->execute();
    }

    /**
     * Deletes an entity
     *
     * @param \SimpleApi\User $user The entity to delete
     * @throws OrmException Thrown if the entity couldn't be deleted
     */
    public function delete($user)
    {
        $statement = $this->writeConnection->prepare('DELETE FROM user WHERE id = :id');
        $statement->bindValues([
            'id' => [$user->getId(), \PDO::PARAM_INT]
        ]);
        $statement->execute();
    }

    /**
     * Gets all the entities
     *
     * @return \SimpleApi\User[] The list of all the entities
     */
    public function getAll() : array
    {
        $sql = 'SELECT * FROM user';

        return $this->read($sql, [], self::VALUE_TYPE_ARRAY);
    }

    /**
     * Gets the entity with the input Id
     *
     * @param int|string $id The Id of the entity we're searching for
     * @return \SimpleApi\User The entity with the input Id
     * @throws OrmException Thrown if there was no entity with the input Id
     */
    public function getById($id): \SimpleApi\User
    {
        $sql = 'SELECT * FROM user WHERE id = :id';
        $parameters = [
            'id' => [$id, \PDO::PARAM_INT]
        ];

        return $this->read($sql, $parameters, self::VALUE_TYPE_ENTITY, true);
    }

    /**
     * Saves any changes made to an entity
     *
     * @param \SimpleApi\User $user The entity to save
     * @throws OrmException Thrown if the entity couldn't be saved
     */
    public function update($user)
    {
        $statement = $this->writeConnection->prepare(
            'UPDATE user SET email = :email, firstname = :firstname, lastname = :lastname,
             age = :age, country = :country
             WHERE id = :id'
        );
        $statement->bindValues([
            'email' => $user->getEmail(),
            'firstname' => $user->getFirstname(),
            'lastname' => $user->getLastname(),
            'age' => $user->getAge(),
            'country' => $user->getCountry(),
            'id' => [$user->getId(), \PDO::PARAM_INT]
        ]);
        $statement->execute();
    }

    /**
     * Loads an entity from a hash of data
     *
     * @param array $hash The hash of data to load the entity from
     * @return \SimpleApi\User The entity
     */
    protected function loadEntity(array $hash): \SimpleApi\User
    {
        $entity = new \SimpleApi\User();

        $entity->setId($hash['id']);
        $entity->setEmail($hash['email']);
        $entity->setFirstname($hash['firstname']);
        $entity->setLastname($hash['lastname']);
        $entity->setAge($hash['age']);
        $entity->setCountry($hash['country']);

        return $entity;
    }
}

Controller Creation

Using apex, create a Controller named User. When prompted pick REST controller.

php apex make:controller User

This command will output:

Open the newly created src/SimpleApi/Application/Http/Controllers/User.php and finish the stubs. Type-hint any objects your controller needs in the controller’s constructor. Create a generic repository object for \SimpleApi\User.

<?php 

namespace SimpleApi\Application\Http\Controllers; 

use Opulence\Http\HttpException; 
use Opulence\Http\Responses\JsonResponse; 
use Opulence\Http\Responses\Response; 
use Opulence\Orm\OrmException; 
use Opulence\Orm\Repositories\Repository; 
use Opulence\Orm\IUnitOfWork; 
use Opulence\Routing\Controller; 

class User extends Controller { 

    /** @var \Opulence\Orm\UnitOfWork */ 
    protected $unitOfWork; 

    /** @var Repository */ 
    protected $repo; 

    public function __construct(\SimpleApi\Infrastructure\Orm\User $dataMapper, IUnitOfWork $unitOfWork) 
    { 
        $this->unitOfWork = $unitOfWork;

        $this->repo = new Repository(
            \SimpleApi\User::class,
            $dataMapper,
            $this->unitOfWork
        );
    }

    /**
     * Creates a entity
     *
     * @return Response The response
     */
    public function create() : Response
    {
        $json = $this->request->getJsonBody();

        $user = new \SimpleApi\User();

        $user
            ->setEmail($json['email'])
            ->setFirstname($json['firstname'])
            ->setLastname($json['lastname'])
            ->setCountry($json['country']);

        if (isset($json['age'])) {
            $user->setAge($json['age']);
        }

        $this->repo->add($user);
        $this->unitOfWork->commit();

        return new JsonResponse($user);
    }

    /**
     * Deletes an entity
     *
     * @param mixed $id The Id of the entity
     * @return Response The response
     */
    public function delete($id) : Response
    {
        $user = $this->repo->getById($id);
        $this->repo->delete($user);
        $this->unitOfWork->commit();

        return new JsonResponse($user, 204);
    }

    /**
     * Shows an entity
     *
     * @param mixed $id The Id of the entity
     * @return Response The response
     * @throws HttpException
     */
    public function show($id) : Response
    {
        try {
            $user = $this->repo->getById($id);
        } catch (OrmException $e) {
            throw new HttpException(404);
        }

        return new JsonResponse($user);
    }

    /**
     * Shows all the entities
     *
     * @return Response The response
     */
    public function showAll() : Response
    {
        $user = $this->repo->getAll();

        return new JsonResponse($user);
    }

    /**
     * Updates an entity
     *
     * @param mixed $id The Id of the entity
     * @return Response The response
     */
    public function update($id) : Response
    {
        $json = $this->request->getJsonBody();

        /** @var \SimpleApi\User $user */
        $user = $this->repo->getById($id);

        if (isset($json['email'])) {
            $user->setEmail($json['email']);
        }
        if (isset($json['firstname'])) {
            $user->setFirstname($json['firstname']);
        }
        if (isset($json['lastname'])) {
            $user->setLastname($json['lastname']);
        }
        if (isset($json['country'])) {
            $user->setCountry($json['country']);
        }
        if (isset($json['age'])) {
            $user->setAge($json['age']);
        }

        $this->unitOfWork->commit();

        return new JsonResponse($user);
    }
}

Open config/http/routes.php and configure CRUD routes to use the controller class.

$router->group(['controllerNamespace' => 'SimpleApi\Application\Http\Controllers'], function (Router $router) {
    $router->group(['path' => '/user'], function (Router $router) {
        $router->get('', 'User@showAll');
        $router->post('', 'User@create');
    });
    $router->group(['path' => '/user/:id'], function (Router $router) {
        $router->get('', 'User@show');
        $router->put('', 'User@update');
        $router->delete('', 'User@delete');
    });
});

Barring any typos you should now have a simple API. To run Opulence locally, use the following command:

php apex app:runlocally

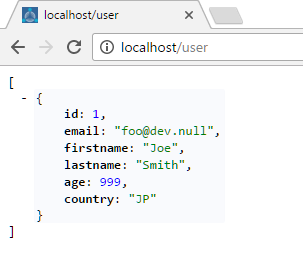
Use a REST client to POST the following JSON to the API:


POST: http://localhost/user


{
    "email": "foo@dev.null",
    "firstname": "Joe",
    "lastname": "Smith",
    "age": 999,
    "country": "JP"
}

Then try:


GET: http://localhost/user
GET: http://localhost/user/1
PUT: http://localhost/user/1
DELETE: http://localhost/user/1 


Got ideas on how to improve validation, error handling, security, or any other Opulence PHP tips? Post in the comments below.